Please note that this guide assumes NTSC throughout, as I've never worked with PAL footage before, and NTSC anime DVDs tend to be easier to work with than PAL ones anyway.
Windows Movie Maker 2 is one of the simplest video editors available today, making it perfect for beginners. It's also free, which is always a good thing. :) However, its simplicity comes at a price: it's rather restricted in some ways. For instance, WMM2 can only edit at two different aspect ratios: 4:3 and 16:9. It can't handle resolutions bigger than 640x480 (4:3) or 640x360 (16:9), and will resize anything bigger to fit (and it won't keep the original aspect ratio). This wouldn't be such a bad thing, except that its resizing sucks. :/
Also, it always works at a framerate of 29.97 (actually, to be totally honest, I don't know whether it's 29.97 or 30 -- it always says 30, but the DV AVI spec requires a framerate of 29.97, and it exports to that just fine) no matter what your source is at, and it won't take AVISynth scripts -- they have to "wrapped" in fake AVI files first.
Unfortunately, the current version of AD&E's AMV Guide doesn't address all of these issues; therefore, if you prepare your footage the way they recommend and then try to use it in WMM2, you'll hit some unpleasant surprises. That's what this guide aims to avoid.
makeAVIS can also be installed separately as part of ffdshow, if it's the only thing from that list that you're missing. You can get a recent version of ffdshow here; I personally use the 5/20/04 build.
4:3 or 16:9?
The first consideration: is your footage supposed to be 4:3 or 16:9? Most anime series and OAVs are at 4:3, as that's the normal TV aspect ratio. However, there are some series (like Haibane Renmei and Chobits) that are encoded anamorphic for 16:9 playback. If you're previewing your project in DGIndex/DVD2AVI and the characters look too skinny, then you probably have such an anamorphic source.
If on the other hand your source is a movie, there's two possibilities: either it's letterboxed or it's anamorphic. It's very easy to check which: preview your project in DGIndex/DVD2AVI and see if there are black bars on the top and bottom. If so, it's letterboxed; if on the other hand the picture takes up the whole frame, then it's anamorphic.
This isn't as complex as it might seem though; anamorphic series and anamorphic movies get treated the same way, and we can also treat letterboxed footage as if it was just normal 4:3. So if you're only using footage from one source, or from sources that are all of the same aspect ratio, there are only two choices to worry about. However, if you are mixing 4:3 and 16:9 footage, please skip ahead to the next section...
Please note that the following resizing instructions are instead of, NOT in addition to, those found in AD&E's AMV guide.
4:3 (or Letterboxed) Footage
Just add this line to your script:
LanczosResize(640,480)
Anamorphic 16:9 Footage
Add these lines to your script:
LanczosResize(640,352)
AddBorders(0,64,0,64)
Yes, 640x352 is not perfect 16:9; however, 352 is a multiple of 16, whereas 360 is not. Keeping the dimensions to multiples of 16 makes encoding easier later on, because of how the distribution codecs work.
You may have noticed that this will return 640x480 letterboxed footage. You may ask, "Why can't we just resize to 640x360 and not bother with the letterboxing? WMM2 does have an option to edit in 16:9, after all." The answer lies on the export side of things: you'll want to export your movie in the DV AVI format, which is restricted to 720x480 (NTSC). However, if you edit in WMM2 at 16:9 (640x360) and then export a DV AVI, WMM2 will resize your video up to fit the whole frame, and everything will look just as stretched as it did before you resized the DVD footage to begin with. Of course, this isn't a problem if you want to encode an anamorphic MPEG-2 flagged for 16:9 playback, but this is not recommended for AMVs, as most contests won't be able to play it back at the right aspect ratio and all your characters will be too skinny as a result. With letterboxed 4:3, you don't have to worry about any of this, and you can export and encode your video as if it was normal 4:3.
So you've got two (or more) sources that are at different aspect ratios, and you want to use them both in the same video? Well... before you can do any resizing, you've got to decide which aspect ratio you want to work in. You could just resize everything using the instructions given above and work that way, yes, but it would mean switching between full-screen and letterboxed video, which can distract your viewers and just generally looks unprofessional.
If you want to work in 4:3, you're going to have to pan-and-scan your 16:9 footage (read: chop off the sides so that it fits). If you want to work in 16:9, you're going to have to letterbox your 4:3 footage. And if we were using any video editor other than WMM, you'd be able to import your footage without doing this beforehand, and move it around/pan-and-scan/letterbox to fit the needs of each individual scene. But since this is WMM2 we're talking about, we don't get that option... so all letterboxing, etc. must be done beforehand.
Please note that the following resizing instructions are instead of, NOT in addition to, those found in AD&E's AMV guide. All the cropping instructions that follow will crop equal parts from each side, leaving you with the middle section. If you really wanted to, you could adjust the cropping for different scenes and make several different scripts, but it seems to me to be more trouble than it's worth.
Working in 4:3
This line is all you need for the scripts for your 4:3 sources:
LanczosResize(640,480)
For your anamorphic 16:9 sources, you'll need:
LanczosResize(848,480)
Yes, that was a negative 104 in the third spot. The minus sign is important.
For your letterboxed 16:9 sources (ugh), you'll need:
Crop(0,64,0,-64) # note: adjust if necessary
Working in 16:9
For your 4:3 sources:
Crop(0,64,0,-64)
For your anamorphic 16:9 sources:
LanczosResize(640,352)
For your letterboxed 16:9 sources:
LanczosResize(640,480)
Mixing 4:3 and 16:9 Footage
Crop(104,0,-104,0)
LanczosResize(848,480)
Crop(104,0,-104,0)
AddBorders(0,64,0,64)
AddBorders(0,64,0,64)
Field Order Considerations
Back when you originally made up your AVISynth script(s) to serve up your VOB(s) via your DGIndex/DVD2AVI project file(s), you had to figure out the field order of your footage and pass it along to Telecide() in order to IVTC your footage correctly. Well, you're going to need to look it up again...
(You should have used Telecide(order=1) for top field first (TFF), or Telecide(order=0) for bottom field first (BFF))
The reason for this is that the DV format is BFF, which is the opposite of most DVDs. If your footage is TFF, and you try to export a DV AVI, you'll get some truly nasty vertical shaking every few seconds. So it's important to get this right.
If your footage is bottom field first (rare), then you're in luck -- you don't have to do anything extra here.
But if your footage is top field first (usual), then add the following line to your script:
ComplementParity()
This reverses the field dominance to bottom field first, ensuring that your DV AVI export later on will have no field order problems.
Update: I've just found out that this doesn't always work quite right, so as a rule of thumb: If you don't have ComplementParity() in your script, and your DV AVI export has nasty shaking, add it; if you do have ComplementParity() and your DV AVI has shaking, remove it.
The former method is good if you already know what clips you're going to need -- you can take only those and then get the VOBs off your hard drive. Also, WMM2 will be able to open them directly, which is a plus, especially for slower computers. The latter is good if you're the kind (like me) who likes to have all his footage available at any given time, and if you're short on HD space and would prefer keeping the VOBs to making big ol' HuffYUV files.
Making HuffYUV AVI Clips
Well, there's really not much to say about this method. Open your scripts in VirtualDubMod, mark off the clip you need, save it using the HuffYUV codec and no audio, and repeat for all the other clips you need.
One thing, though: if you're going to save your HuffYUV clips in YUY2 mode (RGB compression settings = "Convert to YUY2"), make sure you use "Fast recompress" in VirtualDubMod; this will ensure that no unnecessary colorspace conversions take place.
WMM2 plays YUY2 HuffYUV clips just fine on my machine; however, if you experience problems, try checking off the box in the HuffYUV options that says "Always suggest RGB mode for output". If that still doesn't work, re-make the HuffYUV clips as RGB (RGB compression settings = "Predict gradient (best)").
Editing with the VOBs via AVISynth
This one's a little more involved. The first thing we have to do is add the following line to our script:
ConvertToRGB32()
This makes sure that Windows Explorer and WMM2 won't crash when you try to use the fake AVI later on.
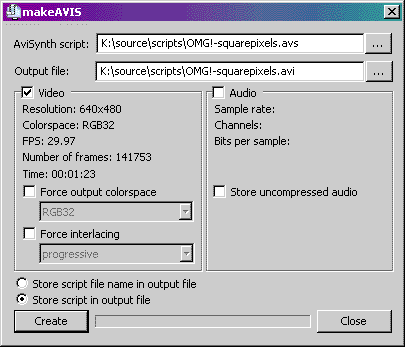
The next thing to do is to get this script into a form WMM2 can use, since it can't open AVISynth scripts directly. For that, we use a handy little program called makeAVIS that comes bundled with ffdshow (and the current AMVapp). What makeAVIS does is "wrap" the scripts, creating small fake AVI files that WMM2 can work with. They're no more than a few megabytes, but they can serve up as much video as you've got in your scripts.
Open up makeAVIS:

Obviously, the script you want to wrap goes in the first blank, and the name of the fake AVI you want to make goes in the second. Let's take a look at the options.
Video: Obviously this should be checked. Resolution should be 640x480 -- if it isn't, then you did something wrong in the resize part of your script. Colorspace should be RGB32 -- if it isn't, then you somehow managed to completely miss the beginning of this section. :P
Force output colorspace shouldn't be necessary, IF the colorspace is RGB32.
Force interlacing shouldn't be necessary either, assuming your source IVTC'ed nicely and has very few or no combed frames left in it.
Audio shouldn't be checked -- your AVISynth script shouldn't be serving any sound anyway.
Store uncompressed audio shouldn't be checked either.
Store script/script file name in output file: I've tried both options, and they both seem to work fine. "Store script file name" is probably the better option, because then you don't have to re-make the file every time you change your script (though changing your script while WMM2 has it open may cause errors). But if you run into problems (I mean things like not being able to open it at all or having it display incorrectly, NOT crashing; WMM2 doesn't need a reason to crash :P ), use the other option.
Once you've got everything set correctly, hit "Create" and let it go. In a few seconds, you'll have a nice small fake AVI, good for importing into WMM2.
For the export side of things, I would refer you again to the pertinent section of AD&E's guide, as they pretty much hit everything. If you were working with letterboxed video and you want to make a distribution copy of it, remember to crop the black from your HuffYUV file before compressing it (or even from your DV AVI before you convert it to HuffYUV, if you prefer).
|
Last updated on 11/8/06
Questions? Comments? Concerns? Contact Scintilla Fight Spam! Click Here! |