Scintilla's Guide to AVISynth Postprocessing Filters: Spatial Smoothers
BlindPP -
DCTFilter -
Deen -
eDeen -
MSmooth -
RemoveGrain
SmoothD -
SpaceDust -
TBilateral -
UnDot -
UnFilter -
VagueDenoiser
(
Home -
Temporal Smoothers - Spatio-Temporal Smoothers -
Sharpeners - Dealing with Dot Crawl -
Dealing with Rainbows
)
Intro
Spatial smoothers generally seek to increase compressibility (by "compressibility", we mean a measure of how small we
can make a video's filesize without losing quality) and/or visual quality by smoothing pixels based on other pixels
in the same frame, hopefully removing noise while keeping the picture intact. The effects of spatial cleaners are usually
much more visually obvious than those of temporal cleaners, and as such this page will probably have more screenshots than
any of the others. All images are high-quality .PNG files (unfortunately I don't yet know how to ensure that PNGOUT will
save a lossless .PNG); I apologize in advance to those of you on dialup.
Filters listed as deblockers aim specifically to reduce blocky noise such as can sometimes result from insufficient
bitrates in MPEG encodes. RemoveGrain was ostensibly developed for
removing film grain but can also be used
for more general smoothing. BlindPP is a deblocker and deringer all in one.
DCTFilter is a special case.
All screenshots on this page can be hovered over to show the differences between the original frame and the filtered
version.
Note: Opera is exhibiting this weird bug where if I open a link in the same tab and then go back to this page, the
onMouseOver functionality no longer works. This doesn't seem to happen in Firefox and IE, and it also isn't happening on
other pages I know that use the exact same code. If you experience this problem, simply reload the page.
BlindPP
The deblocker/deringer contained in the MPEG2Dec3/DGDecode package.
Type: Plugin
Found in file: MPEG2Dec3DG.dll, DGDecode.dll
Author: MarcFD? (The DGDecode plugin is currently maintained by Neuron2)
Homepage:
http://www.neuron2.net/dgmpgdec/dgmpgdec.html
Colorspaces: YUY2 or YV12
Interlacing: Interlaced or progressive
Speed: Fast! (200+ fps)
Defaults: BlindPP(quant=2, cpu=6, ipp=false, moderate_h=20, moderate_v=40)
Parameters:
- quant (0-31) determines the strength of the deblocking.
- cpu (0-6) determines what deblocking and deringing will occur. If you want to skip deringing entirely, set this
to 4; if you only want to dering the luma and not the chroma, set this to 5. Lower values will start disabling the
deblocking.
- ipp (true/false) should be set to true if your video is interlaced, otherwise leave it false.
- moderate_h and moderate_v (0-255) are thresholds for determining where to deblock. Lower
values will hit more blocks.
Usage notes:
- BlindPP attempts to fix 8x8 blocks resulting from the DCT used by the MPEG encoding process;
therefore, do not crop or resize before using BlindPP.
- If your source was served using MPEG2Source, do not use BlindPP; use MPEG2Source's built-in deblocking instead.
It will work better.
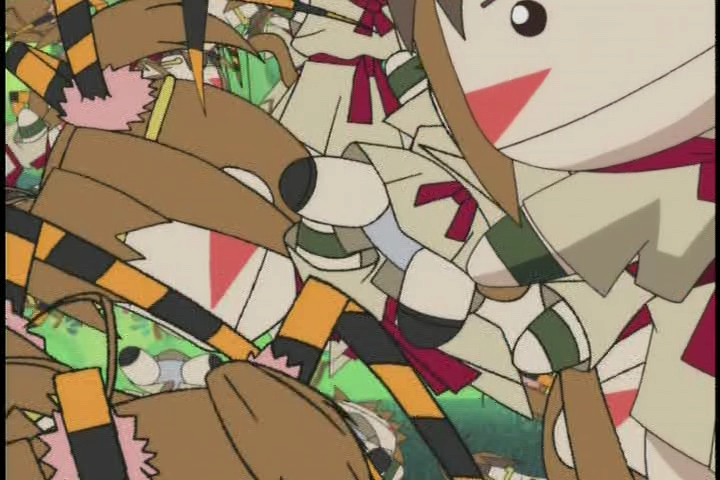
Here's a screenshot from the Excel Saga opener, taken from the VOB with no postprocessing.
As you can see, the background is a complete mess of blocks, almost giving a certain gridding effect --
exactly the kind of problem BlindPP is meant to deal with.
Hover your mouse over the image to bring up the version filtered with
BlindPP(quant=12,cpu=4,moderate_h=15,moderate_v=25):
You can see how many of the blocks have been smoothed out. Even the filesize of the .PNG is noticeably smaller.
But these settings are pretty darn strong; if you dare use settings this strong,
you had better check the less blocky scenes of your video to make sure that
they aren't losing too much detail as a result. You may be able to limit the damage by raising the values of
moderate_h and moderate_y.
Something to watch out for: Here you can find a screenshot
taken with the totally ridiculous settings
BlindPP(quant=32,cpu=4,moderate_h=15,moderate_v=20). Notice the blocks on the
line above Excel's eyelashes (there are other blocks, but those are the most obvious)
-- that used to be a perfectly fine line. If you see artifacts like this, then you're
using BlindPP too aggressively.
Back to top
DCTFilter
An experimental filter that operates on DCT coefficients.
Type: Plugin
Found in file: DctFilter.dll
Author: Trbarry
Homepage:
http://www6.impacthosting.com/trbarry/downloads.htm
Colorspaces: YUY2 or YV12
Interlacing: Progressive only (if your source is interlaced, you can try SeparateFields() before and
Weave() after, but I'm telling you, it really doesn't work as well)
Speed: FAST! (300+ fps)
Defaults: DCTFilter(1,1,1,1,1,1,1,1)
Recommended: DCTFilter(1,1,1,1,1,0.75,0.25,0)
Parameters: Each of the 8 parameters is a floating point value that corresponds to a scaling factor for one
of the 8 rows and columns of the 8x8 DCT blocks, starting with the top row and leftmost column (the first parameter should
always be 1; otherwise your video will seriously look like crap).
Usage notes: Because of the way DCTFilter works, you should always put it after all cropping and resizing if you're trying to use it to increase your compressibility.
For an explanation of the DCT algorithm as used in image compression (if the following notes
confuse you), go
here.
DCTFilter is a pretty cool idea for a filter; it works directly on the DCT coefficients of an image.
The reason this is useful is because distribution codecs such as MPEG-1/-2, DivX, XviD, etc. all use the DCT algorithm with
the same 8x8 blocks that DCTFilter works on. DCTFilter can zero out, reduce, or amplify certain DCT coefficients with
interesting effects; it's not strictly a smoother. But from a compressibility standpoint, it helps us the most to
reduce the highest-frequency
coefficients (the rightmost columns and bottom rows of the DCT frequency matrix). That's why the "Recommended" parameters
are set the way they are.
However, as godly as DCTFilter can be for compressibility when used in this way (and the gains ARE awesome, make
no mistake about that), it can cause problems with edges.
Because anime is so full of sharp edges, which rely on high DCT frequencies, this can be a problem -- you may notice that
DCTFilter partially undoes your previous sharpening efforts, or makes edges that weren't that well-defined to begin with
even less sharp. And personally, I really like sharp, well-defined images. This is why I do not recommend DCTFilter
for anime unless you're desperate to give your compressibility a big boost. And if you do use it, make sure that it's not
blurring details or unsharpening edges too much.
Here's a screenshot from Azumanga Daioh episode 13, together with the same frame after going through
DCTFilter(1,1,1,1,1,0.75,0.25,0) (hover your mouse over the image to see the
filtered version):
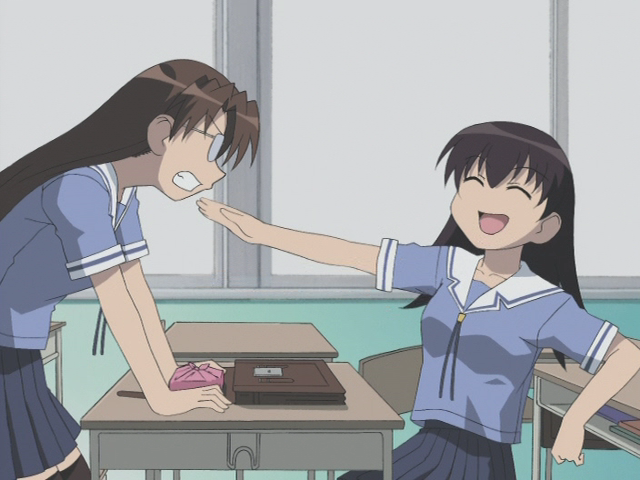
The difference is very slight, but it is there. For example, pay attention to the topmost desk --
you can see that the horizontal
lines lose some of their sharpness. (Okay, so I didn't pick the best reference frame, but you get the idea.
The difference would probably be more noticeable if I had done some sharpening first; the edges in this scene aren't the
sharpest things in the world.)
I've provided some more screenshots in order to give you an idea of the kinds of things DCTFilter can do besides
reducing the higher frequencies to improve compressibility:
DCTFilter(1,1,0,0,0,0,0,0) - almost everything is zeroed out,
only allowing the simplest possibilities for each 8x8 block.
The file is almost half the size of the original screenshot, but who would want to watch this?
DCTFilter(1,1,1,1,1,1,1,8) - I've amplified the highest frequencies so high
that they're impossible to miss. Also, the filesize is ridiculous.
Back to top
Deen
6 smoothers in one; I'll only be discussing the "a2d" and "w2d" modes here.
Type: Plugin
Found in file: Deen.dll
Author: MarcFD
Homepage: http://ziquash.chez-alice.fr/
(but see here for the older version that I recommend,
as it includes the "W" gradient-preserving modes I'll mention below. MarcFD's page and the AVISynth Filter
Collection both contain only the most recent version, which does not have these modes.)
Colorspaces: YV12 only
Interlacing: Progressive only
Speed: Average to slow (36 fps with mode="a2d" and rad=4, but only 10 fps with mode="w2d" and rad=7)
Defaults: Haven't got a clue.
Recommended: Deen(mode="a2d", rad=4, thrY=7, thrUV=9, min=0.5)
Parameters:
- mode - There are six different values this parameter can take, but I'm only going to talk about two of them here.
"a2d" is 2-dimensional smoothing optimized for areas of flat colors, such as in anime; "w2d" is similar,
except pixels are weighted by distance from the pixel being operated on so as to better retain gradients.
I suggest "a2d" (because it's faster) unless you notice that your gradients are getting wrecked, in which case you should
switch to "w2d".
If you already use the 3D modes, that's fine, but I prefer to use separate temporal (or spatio-temporal) smoothers.
- rad (1-7 in the 2D modes) determines how wide of an area to consider for any given pixel. So rad=1 will
look at pixels in a 3x3 area, while rad=7 will cover a 15x15 area. Raising this value strengthens the smoothing but
also slows the filter down and may wash out the image.
- thrY and thrUV (0-255?) are the thresholds for luma and chroma respectively. Increasing these values
will strengthen the smoothing on the luma or chroma respectively.
- min is a great parameter to have, and I wish EADFAG had mentioned it. It allows you to calm wide-range smoothing
by reducing the thresholds (in "a2d") or pixel weights (in "w2d") as distance from the current pixel increases. min=1
does no reduction; min=0 does maximum reduction; and any floating point value in between gives a result in between.
Usage notes:
- Beware of washed-out images and detail loss!
These days, Deen is probably responsible for more over-smoothed, washed-out AMVs
than any other smoother. If you're getting a washed-out result, try reducing min, all the way to 0 if necessary;
if that doesn't cut it, then your radius and/or thresholds are too high and you should reduce them.
- Beware of memory issues. Sometimes, when I'm encoding a video from a script that includes Deen, VirtualDubMod
will just up and quit on me in the middle (after running my RAM into the ground). If this happens to you, try reducing
the amount of memory your script can use by using the SetMemoryMax() function, or else just cut out Deen entirely
and use a different smoother.
Many of you already know Deen from
EADFAG's page on AVISynth postprocessing, where it was the only spatial smoother gone into in any detail. While it is
a good smoother, it's easy to go overboard with it, plus I have the aforementioned memory issues with it
(don't expect that to be fixed anytime soon; this filter hasn't been updated since 2003).
If you can keep it from oversmoothing the image, then Deen is worth using; it's capable of posting some nice
compressibility gains, and the overall effect is a pleasing one in moderation.
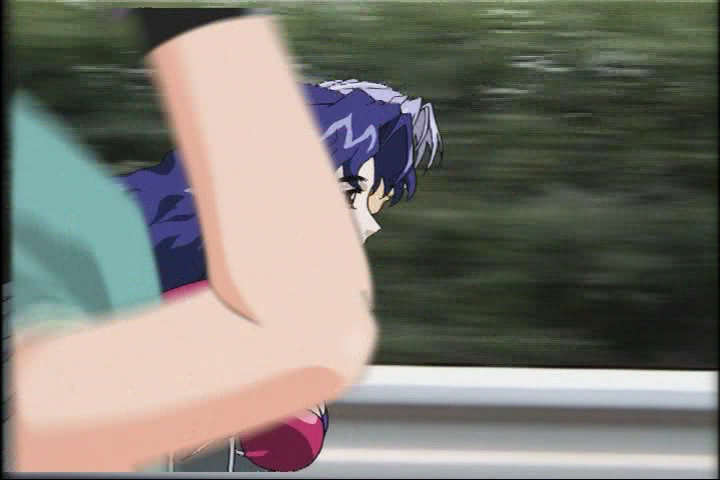
Our next screenshot comes to us from Love Hina, together with the same frame after going through
Deen("a2d",7,11,13,min=0.5) (yup, hover over image to see filtered version):
Look at almost any line on the original, and you'll see mosquito noise; then look at how Deen cleans it up.
Much better, isn't it? Of course, I did select a frame with mostly areas of flat, solid colors with not much detail;
other scenes would probably require weaker settings.
Something to watch out for: I shouldn't even have to give any examples of this, but here's one anyway.
Taken with the settings of Deen("a2d",7,14,20) on a source that didn't need it:
This is Deen killing trees. Those trees
used to be happy trees. Please, think of the trees... not to mention the
rampant color fading. If you see things like this happening in your video, then you're using Deen too aggressively.
Back to top
eDeen
Self-proclaimed "spatial monster". Translation: very powerful, use with care.
Type: Plugin
Found in file: eDeen.dll
Author: MarcFD
Homepage: http://ziquash.chez-alice.fr/
Colorspaces: YV12 only
Interlacing: Progressive only
Speed: Average to slow (around 20 fps with r=7)
Defaults: eDeen(r=7, ty=14, tuv=21, ly=2, luv=3, hqc=true)
Parameters:
- r (1-20) is the radius, as with Deen -- 1 smooths over a 3x3 area for each pixel, while 20 covers a 41x41 area
(yowza!). Higher values strengthen the smoothing but slow the filter down.
- ty and tuv (0-255) are the luma and chroma thresholds, respectively. Increasing these values
will strengthen the smoothing on the luma or chroma respectively.
- ly and luv are what MarcFD calls the "lowratios"; they work similar to Deen's min parameter,
except that increasing these values will calm the smoothing. With a smoother as strong as eDeen, these are very
useful things to have.
Their minimum value is always zero; the maximum
value for a lowratio is equal the greatest integer lower than the respective threshold divided by the radius (ty/r or tuv/r).
So, if you have r=5, ty=15, tuv=22, then ly can range from 0 to 3 and luv can range from 0 to 4.
Be careful not to set these higher than the maximum values -- if you do, your application will quit without
warning.
- hqc (true/false) is for High Quality Chroma filtering; this should always be true unless you really need to
speed up your script for some reason.
Usage notes:
- Beware of washed-out images and detail loss!
The same warning I slapped on Deen also applies to eDeen. If your video looks too washed out, then increase the lowratios
(BUT NOT OVER THE MAX); if that doesn't help, then decrease your radius and/or thresholds.
- Beware of memory issues. eDeen will sometimes cause annoying "access violation" errors; I believe the answer to
this is to give the script MORE memory with the SetMemoryMax() command. If anyone has more information on this,
please let me know.
- I'll say it again: Do not set the lowratios higher than their respective thresholds divided by the radius.
The screenshot for this filter is taken from that wonderful shining paragon of visual quality known as A.D. Vision's
original R1 release of Neon Genesis Evangelion (yes, that was sarcasm). This is a perfect reference frame for eDeen,
because it contains large areas of flat colors with very few details. The target this time is not so much the mosquito
noise on the edges as the little variances within the large flat colored areas themselves. The following comparison is
brought to you by the settings eDeen(7,7,14,1,2):
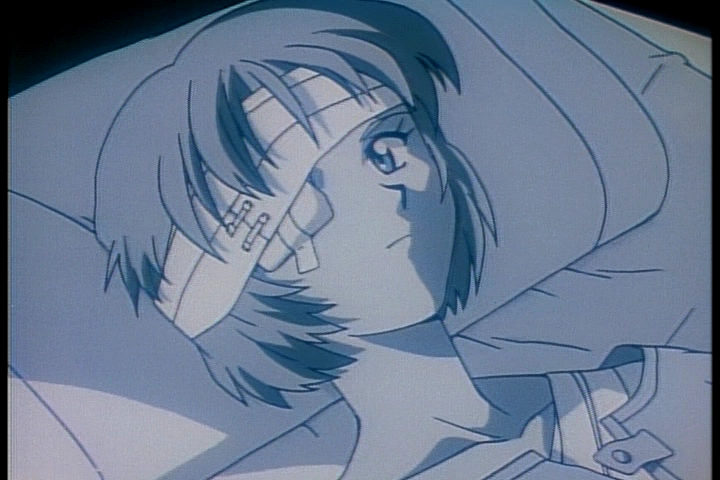
Look at any area of color on the original, and you'll find little imperfections everywhere. Then watch as eDeen
smooths them out. Just that one filter shaves 29% off the filesize of the image!
In conclusion, eDeen is a great smoother if you don't have much detail to worry about; just make sure you're not
washing out the image.
Back to top
MSmooth
Masked smoother, designed specifically for anime.
Type: Plugin
Found in file: MSmooth.dll
Author: Neuron2 (Donald Graft)
Homepage:
http://www.neuron2.net/msmooth/msmooth.html (but see
this forum thread for the
latest RC version, which fixes the chroma bug; this is the version I've included in the ZIP)
Colorspaces: RGB32 or YV12
Interlacing: Progressive or field-based (at least, I don't know why it wouldn't work on fields)
Speed: Slow (14 fps with strength=3 and chroma=false)
Defaults: MSmooth(mask=false, threshold=15, strength=3, extend=false,
blurmore=false, chroma=false)
Parameters:
- mask (true/false), when set true, will display a detail mask of the current frame rather than the
frame itself; dark areas of this mask are set to be smoothed, while bright areas are set as detail. How much of the frame
is set as detail depends on how you set the threshold parameter. When set false, the filter displays the
processed frame (normal operation).
- threshold (0-127) determines how much of the image is determined to be detail and thus not smoothed across.
Raise this value to smooth more of the image, or lower it to preserve more edges and detail.
Typically you want to set threshold so that all edges and details are preserved, but no noise. You can see what
areas are set to be preserved with the mask parameter...
- strength (0-25) determines how strongly to smooth the areas not marked as detail. Raising this value will
slow the filter down.
- extend (true/false), when set true, reduces the strength of the blurring around detailed areas by
expanding the mask for the earlier blurring passes.
- blurmore (true/false), when set true, constructs the mask using a blurred version of the
original frame. This can be useful if the filter is incorrectly detecting noise as detail.
- chroma (true/false), when the filter is running in YV12, determines whether or not to smooth chroma.
chroma=true will smooth luma and chroma, while chroma=false will smooth luma only. The filter runs slower
with chroma smoothing than without. If you are using MSmooth in RGB32, then chroma is always smoothed.
Usage notes:
- EADFAG mentions that MSmooth has a bug in its YV12 mode that causes processed frames to acquire a yellowish tint. LIES.
This has been fixed in newer versions of the filter (as of version 2.0.2) and is no longer an issue.
- If you find you are losing too many details, reduce threshold and/or strength;
if the image is too washed-out for your taste, reduce strength.
- It's possible that you may find settings of threshold and strength that work perfectly for the luma but
cause chroma bleeding across edges; if this happens to you, then set chroma=false.
- Don't get pathological with the strength parameter. Values over about 10 are almost never a good idea and
may result in some strange things happening to your image.
- If your mask is picking up too much noise as detail, consider setting blurmore=true.
- If you have bleeding problems near edges, consider setting extend=true.
- Older versions of this filter had the problem that
occasionally, when scanning through a script that includes a call to MSmooth with mask=true, you might get
chroma from a totally different frame on some frames. The version 2.1 release candidate fixes this bug
(see link to forum thread above) and it is therefore the one that I include in the ZIP.
MSmooth was designed specifically for anime, and the idea behind it is a pretty cool one: Since smoothing should never occur
across edges and details, a mask is first created that separates out the edges and details; then the REST of the image is
smoothed.
Using MSmooth is normally a two-step process: first, with mask=true, you adjust the threshold until the mask
preserves a proper amount of detail and edges, then you set mask=false and adjust the strength until the
smoothing is at the right level (also tweak threshold if it turns out you're preserving more or less detail than
you thought). To illustrate the process, we once again go to Neon Genesis Evangelion (non-Platinum),
first with a screenshot that illustrates the mask, taken with settings of
MSmooth(threshold=7, strength=3, chroma=true, mask=true):
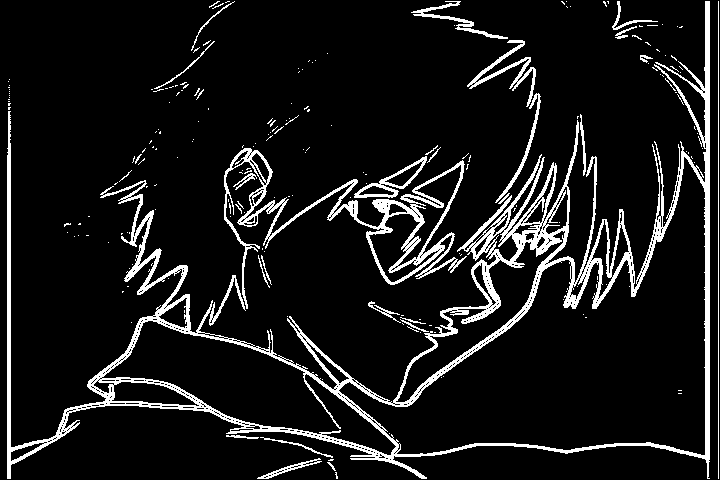
Notice that the edges are bright while everything else is dark. Looks pretty good, but we'll see that some of the edges
aren't preserved as well as this mask might lead us to believe they'd be.
As it turns out, these settings preserve almost all of the lines of Kaoru's figure, but not the outlines of the clouds
in the background. What follows is the standard comparison shot (the filtered version is what we see after setting
mask=false; hover over to compare):

You can see that the clouds' outlines didn't hold up as well as Kaoru's figure. Also, certain edges in Kaoru's hair have
also been blurred (check out the top right corner of the frame); thus, a lower value of threshold might have been
wise in this case. Still, we got quite a healthy compressibility increase out of the deal.
Something to watch out for: This screenshot, filtered with
MSmooth(strength=5,mask=false,threshold=25,chroma=true), illustrates the dangers
of not setting threshold low enough. Ugh! Blurry and smeary all over. Not at all attractive.
Back to top
RemoveGrain
Originally meant for degraining purposes but can be used for general denoising.
Type: Plugin
Found in file: RemoveGrain.dll
Author: Kassandro
Homepage:
http://home.pages.at/kassandro/RemoveGrain/
Colorspaces: YUY2 (with planar=true) or YV12; claims to support RGB32 and RGB24, but I can't get
RGB32 to work, and RGB24 gives weird artifacts on most modes. If anyone figures it out, please let me know.
Until then, if the mode you want doesn't work with your current colorspace, then convert to YV12.
All modes work in YV12.
Interlacing: Interlaced only (modes 13-16) or progressive only (all other modes)
Speed: Insanely FAST!! (800+ fps with mode=17)
Defaults: RemoveGrain(mode=2, modeU=2, modeV=2)
Parameters:
- mode (0-18) determines what denoising mode to use for the luma; I list the modes below.
- modeU and modeV determine what denoising modes to use for the two chroma channels; modeU defaults
to whatever mode currently is, and modeV defaults to whatever modeU currently is. Therefore, the
default settings could also be expressed as RemoveGrain(mode=2); if you wanted
mode 17 for the luma and mode 2 for both chroma planes, you could use
RemoveGrain(mode=17,modeU=2). The modes are just the same as the luma modes.
- The list of modes follows (but I'm only going to talk about the progressive modes):
- Mode 0 means that the selected plane is merely passed through without any filtering. This is useful if you
only want to filter certain planes and not others (for example, filter the luma and leave the chroma alone).
- Mode 1 does pure minmax clipping with all eight of a pixel's spatial neighbors. Thus it is identical to
trbarry's Undot filter. It is the safest mode with regards to artifacts, and it preserves thin lines including their
endpoints.
- Mode 2 does minmax clipping with the middle six (in value) of a pixel's eight spatial neighbors. It "does
significantly more denoising" than Mode 1, it is still
fairly artifact-free, and it preserves thin lines including their endpoints.
- Mode 3 does minmax clipping with the middle four (in value) of a pixel's eight spatial neighbors. It carries
a fair risk of artifacting and may destroy thin lines.
- Mode 4 does minmax clipping with the middle two (in value) of a pixel's eight spatial neighbors. According to
Kassandro, it causes the greatest gains in compressibility, but also carries the highest risk of artifacting and may
destroy thin lines. Use with caution.
- Mode 5 is edge sensitive, using only "line pairs" of a pixel's spatial neighbors for minmax clipping. It is
quite safe with regards to artifacts, and it preserves thin lines including their endpoints.
- Modes 6-8 are edge sensitive modes somewhere between Mode 5 and Mode 9. They preserve thin lines, but they
may cause endpoints to be lost. The higher the mode number, the more likely such artifacts will occur. At the same time,
the higher-numbered modes give better compressibility boosts.
- Mode 9 is edge sensitive, using the line pair of a pixel's spatial neighbors with the least difference
between pixels for minmax clipping. It offers better compressibility gains than the other edge sensitive modes (5-8),
but it has problems with thin lines. Use with caution.
- Mode 10 is not mentioned anywhere in the documentation, so I have no idea what it does.
- Mode 11 blurs all pixels horizontally and vertically with a (1/4, 1/2, 1/4) kernel. I won't say any more about
it, as it differs so much from the other modes. Superseded by Mode 12.
- Mode 12 is a significantly faster version of Mode 11. If for some reason you want to use the blur instead
of one of the normal minmax clipping modes, use this and not Mode 11.
- Modes 13-16 are bob modes for interlaced source, and this is where I start wondering why on earth Kassandro
included Modes 11-16 in RemoveGrain instead of making them their own separate plugin, because their functions are so
incredibly different from the normal denoising modes. I'm not going to say anything more about them.
- Mode 17 is the "smart mode": It acts like Mode 4 unless Mode 4 would destroy a thin line going through the
current pixel, in which case it switches to a weaker mode. It preserves thin lines but may lose the endpoints, and it
carries moderate risk of artifacts (mostly softness). It offers excellent compressibility gains and is Kassandro's
current personal favorite.
- Mode 18 is like Mode 17, except that it also preserves endpoints of thin lines. However, it is not as good for
compression as Mode 17.
Usage notes:
- RemoveGrain should be used before cropping, as it cannot change border pixels.
- RemoveGrain is fast as hell, so it makes perfect sense to call it multiple times for better denoising. For example,
RemoveGrain(mode=2).RemoveGrain(mode=2) would be perfectly acceptable and would
probably produce a pretty nice result with most sources.
- As mentioned above, some modes (esp. 3, 4, and 9) have problems with thin lines. If this gets really bad on your
source, consider using a more line-friendly mode for the chroma (e.g., mode 1, 2, or 5). For example:
RemoveGrain(mode=4,modeU=5) will use mode 4 for the luma but mode 5 for the chroma.
- Kassandro gives the following ranking of modes with regard to risk of artifacts, from safest to most risky:
1, 5, 2, 18, 6, 7, 8, 17, 3, 4, 9. If you get too much artifacting with your chosen mode, try switching to a
lower-risk mode.
- Kassandro gives the following ranking of modes with regard to compressibility, from greatest compression gains to least
compression gains: 4, 17, 9, 8, 3, 7, 6, 2, 5, 1. Apparently modes 4 and 17 are significantly better in this
respect than the others.
- If for some reason RemoveGrain doesn't work on your system, then replace RemoveGrain.dll with RemoveGrainS.dll
in your AVISynth plugins directory. Please note that both .DLL files should never be together in the plugins directory
at the same time.
RemoveGrain is meant for removing noise of the very small variety, on the order of a pixel or so. The changes it causes
are not always the most visible (more subtle than those of, say, Deen or MSmooth), but they can have a large effect on
compressibility. And of course, you can't argue with the speed -- this thing is just blazingly fast.
This time, I've chosen a reference frame from Angel Sanctuary. We're going to attempt to reduce the noise on the floor
tiles without completely wiping out the texture. As usual, hover your mouse over the original image to see the frame as
filtered with RemoveGrain(mode=17).RemoveGrain(mode=17) (yes, I ran the filter
twice):
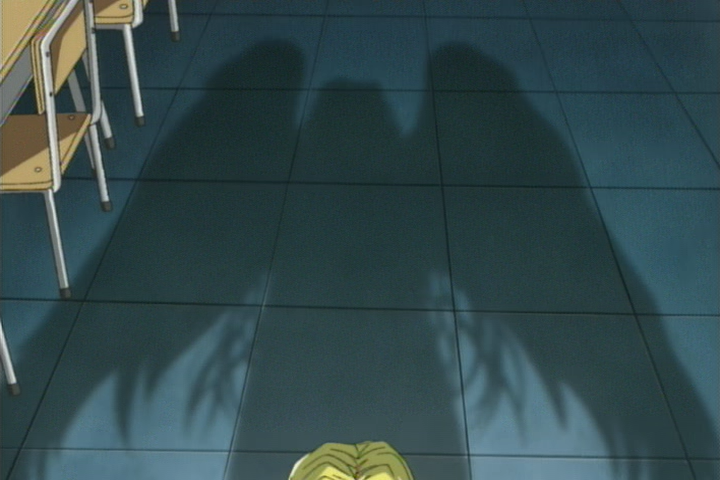
The noise on the floor is reduced quite a bit, and as a result, we've managed to shave 40% off the size of the image file.
However, this came at the price of some softening of the lines in the image (especially the details on the chair have been
blurred); it wouldn't be a bad idea to combine this with a sharpener of some kind, or to use a safer mode.
As long as you don't lose too much detail, RemoveGrain can give you some very handsome compressibility gains. But if
you want to go one step further and use the power of RemoveGrain as part of a very nice spatio-temporal filter, then you'll
want to check out LRemoveDust.
Back to top
SmoothD
Meant as a deblocker but good for general denoising as well.
Type: Plugin
Found in file: SmoothD.dll
Author: 708145 (Tobias)
Homepage:
http://www.funknmary.de/bergdichter/projekte/video/SmoothD/
Colorspaces: YV12 only
Interlacing: Progressive only
Speed: Slow (15 fps with num_shift=4)
Defaults: SmoothD(quant=3, num_shift=4, adaptive_shift=0, zero_weight=1)
Recommended: SmoothD(2,6,0,1)
Parameters:
- quant (1-31) determines the quantizer value used; raising this value strengthens the filtering.
- num_shift (1-8) determines the number of shifted versions of each block to use for filtering; raising this value
makes the denoising more accurate but slows the filter down.
- adaptive_shift (0 or 1), when set to 1, varies num_shift depending on quant. I've never really
seen a need for this, but maybe it's good for something...
- zero_weight (1-8) determines how much weight the original (unshifted) block should get. Raising this value
weakens the filtering but preserves more detail.
Usage notes:
- Currently, SmoothD only operates on the luma.
- SmoothD should be used before cropping and/or resizing.
- If you find too much detail getting lost, raise zero_weight and/or lower quant.
SmoothD is a fairly young filter; it's not even up to a version 0.1 yet. However, it's a very good denoiser that's capable
of posting some impressive compressibility gains. It works by re-applying the JPEG compression process (I mean
DCT-quantize-inverse DCT) on shifted copies of each block (and no, I have no idea how that helps). Though ostensibly
developed for deblocking, it can also be effective against mosquito noise.
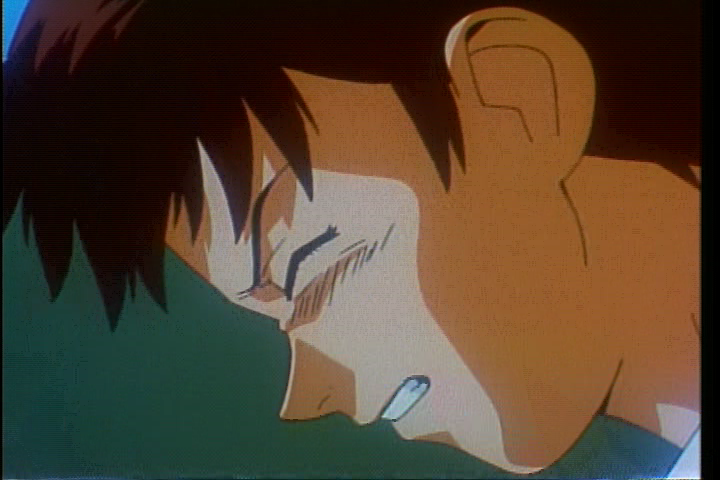
Take a look at this screenshot from FLCL, first unfiltered and then run through
SmoothD(2,6,0,3):

The standard warnings against oversmoothing apply, of course. If you don't have much detail to worry about, then SmoothD
might be a very good idea for compressibility purposes. (Especially if you have scenes that need deblocking, of course.)
Back to top
SpaceDust
The spatial filter from the Dust family. Subtle but effective.
Type: Plugin
Found in file: DustV5.dll
Author: Steady
Homepage: none
Colorspaces: RGB24, RGB32, or YUY2 (note: NO YV12 SUPPORT)
Interlacing: Progressive only (I believe)
Speed: Fast! (180+ fps)
Defaults: SpaceDust()
Parameters: There's only one, and it's not worth mentioning.
Usage notes:
- IMPORTANT: The Dust filters do NOT support YV12. This is because they were written for AVISynth 2.0.x, which
was incapable of working in the YV12 colorspace; a version for AVISynth 2.5.x was never coded.
If you try to feed SpaceDust YV12 input, your application will suddenly quit without warning. Always convert to YUY2 first.
- IMPORTANT: The Dust filters do not autoload. Again, this is because they were written for AVISynth 2.0.x and
not 2.5.x.
To use them, you first have to load a plugin called LoadPluginEx2.dll (in a separate directory from your default
plugins directory, because it will break autoloading otherwise); I've taken care of this for you in an autoloading .AVSI
helper script. Then you manually load DustV5.dll by putting the following line before calling the filter:
LoadPlugin("C:\avs25\plugins\DustV5.dll") (of course, replace the path given
with the path to your AVISynth plugins directory).
- IMPORTANT: Do not call the Dust filters more than once in one script. This also means that if you use SpaceDust
in a
script, you can't use FaeryDust, PixieDust, or GoldDust in that same script.
- SpaceDust should probably be used after cropping and resizing, but I'm not sure about this.
SpaceDust is the spatial-only filter from the Dust family of filters, coded by Steady for AVISynth 2.0.x (a version for
2.5.x was never released). I have no idea how it works, so don't ask (and the source code was never released, so I
couldn't figure it out that way either). All I know is that it's reasonably fast and can reduce noise and improve
compressibility fairly nicely. If I remember correctly, the visual effects aren't as blatant as those of (say) Deen
either.
The biggest complaint about the Dust filters is that they tend to cause blocking, but this shouldn't be much of an
issue with SpaceDust. As far as I can tell, the only noticeable harm SpaceDust does is in slight blurring of
details. However, if either of these becomes a problem for you, then about all you can do about it is drop it and
use a different filter (unfortunately).
Once again, it's back to Neon Genesis Evangelion (not Platinum) for this comparison shot (hover over image to see
filtered version):

You may notice... um... only the tiniest difference between the images. Heck, even I can't find anything that really
sticks out as a noticeable difference. But the .PNG of the filtered version is 25% smaller than the original, and one
can't argue with that. Again, don't ask me how it does it, because I have no idea. Let's just say "it's awesome" and
leave it at that. :)
Because the effect is so subtle, SpaceDust can probably be combined with other smoothers to good effect.
In conclusion, SpaceDust is a fine choice for many sources; the effects are subtle, but the compressibility gains can be
very nice. Plus, it's fast too. However, if you want to take full advantage of the Dust filters and do some
stronger filtering, you might want to look
into PixieDust and/or GoldDust; SpaceDust was meant
mainly for those looking for maximum speed out of the Dust filters.
Back to top
TBilateral
A filter that uses bilateral smoothing. Slow but effective.
Type: Plugin
Found in file: TBilateral.dll
Author: Tritical
Homepage: http://www.missouri.edu/~kes25c/
Colorspaces: YUY2 or YV12
Interlacing: Progressive or field-based
Speed: Slow to very slow (8 fps at default settings; increasing diameter slows even more)
I'm not actually going to write up this filter yet, because it's quite complicated and very slow (though it's often
very effective); I'll cover the other filters first, and hopefully I'll get to writing this one up eventually.
Back to top
UnDot
Simple minmax clipping for cheap, risk-free compressibility gains.
Type: Plugin
Found in file: UnDot.dll
Author: Trbarry
Homepage:
http://www6.impacthosting.com/trbarry/downloads.htm
Colorspaces: YUY2 or YV12
Interlacing: Progressive or interlaced (I don't know why interlaced wouldn't work, at least)
Speed: Insanely FAST!! (800+ fps)
Defaults: UnDot()
Parameters: None!
Usage notes:
- In YV12 mode, UnDot filters both luma and chroma; however, in YUY2 mode, it only filters luma.
UnDot's theory of operation is very simple: it clips each pixel to stay within the mininum and maximum values of its
eight spatial neighbors (pure minmax clipping, therefore identical to
RemoveGrain(mode=1)).
This doesn't produce a very visible effect at all, but it helps compressibility. Because UnDot can be used without losing
any details* and with hardly any speed penalty, it's a good filter to use before other smoothers.
* Exception: Do NOT use UnDot if your video contains any dither dissolves. Since these rely on single
isolated pixels being from a different clip than those around them, UnDot will destroy the effect by whipping those
deviant pixels into line with their surroundings.
Because the visual effect of UnDot is barely noticeable, it's pointless to provide a comparison screenshot for it.
So I won't.
Back to top
UnFilter
The smoothing side of UnFilter is meant to counteract overdone edge enhancement on DVDs.
Type: Plugin
Found in file: UnFilter.dll
Author: Trbarry
Homepage:
http://www6.impacthosting.com/trbarry/downloads.htm
Colorspaces: YUY2 or YV12
Interlacing: Progressive or field-based (I believe)
Speed: Insanely FAST!! (800+ fps with HSharp=-10, VSharp=-10)
Defaults: NONE (will give an "Invalid arguments" error if you try calling it without any parameters!)
Recommended (for porn smoothing): UnFilter(HSharp=-5, VSharp=-5)
Parameters:
- HSharp and VSharp (-100 to 100) determine the amount of sharpening/smoothing to be done in the horizontal
and vertical directions respectively. -100 gives the smoothest result, 100 the sharpest; 0 does nothing.
Usage notes:
- Positive values of HSharp
and VSharp will sharpen in the respective direction; negative values will smooth. So for smoothing purposes, you
always want negative values; -100 is maximum smoothing while 0 is none at all.
- Frame width must be a multiple of 2, but if your video is YUY2 or YV12, this should be true already.
UnFilter is a dual-purpose filter: it can be used for either sharpening or smoothing.
Both sides were meant to counteract detrimental practices in DVD authoring
(its sharpening was meant to reverse oversmoothing; its smoothing was meant to reverse overdone edge enhancement).
When used as a smoother, UnFilter can provide nice compressibility gains, especially considering the blazing speed.
However, it works mainly against sharp edges, and anime is full of those.
So just make sure you're not smoothing so much that you start losing details.
The recommended values should be safe for most sources; for even better compressibility, lower the values of the
arguments (that means closer to -100, not closer to 0, just so we're clear). But if you find that even the recommended
values are hurting your edges too much, then use a different filter.
Back to top
VagueDenoiser
A wavelet-based denoiser, subtle but effective. A personal favorite.
Type: Plugin
Found in file: VagueDenoiser.dll
Author: Lefungus, Kurosu, and Fizick
Homepage:
http://avisynth.org.ru/vague/vaguedenoiser.html
Colorspaces: RGB24, RGB32, YUY2, or YV12
Interlacing: Progressive or interlaced
Speed: Average to slow (30 fps in YV12, 22 fps in YUY2; most settings made very little difference)
Defaults: VagueDenoiser(threshold=0, method=3, nsteps=4, chromaT=-1,
interlaced=false)
Recommended: VagueDenoiser(threshold=2, method=3, nsteps=6, chromaT=2.0)
Parameters:
- threshold (any float, apparently) determines the strength of the luma filtering.
Setting this less than 0 disables luma smoothing; setting it equal to 0 causes the filter to estimate
the strength automatically for each scene (adaptive thresholding).
- method (0 to 3) determines what filtering method will be used:
- Method 0 is hard thresholding, where all values below the threshold are zeroed. This method can support higher
threshold values than the others before the video starts looking oversmoothed.
- Method 1 is soft thresholding, where all values below the threshold are zeroed and all values above the threshold
are reduced by the threshold.
- Method 2 is adaptive thresholding, which means that the threshold is scaled depending on the wavelet data.
- Method 3 is Qian's (garrote) thresholding, somewhere in between hard and soft thresholding. Currently, this is
the preferred method to use.
- Method 4 is a uniformly smooth shrinking function; I admit I have no idea what that means as far as results go.
- nsteps (1 to about 8) determines the number of times the wavelet will decompose the picture. Higher values give
more accurate results at the expense of speed (though I have not detected a speed difference).
- chromaT (any float, apparently) sets a threshold for chroma filtering. If this is less than 0, then the filter
won't touch the chroma at all. If chromaT=0, then adaptive thresholding is used for the chroma.
- interlaced (true or false), when true, will process the clip's fields separately.
Usage notes:
- If using VagueDenoiser with interlaced content, be sure to set interlaced=true.
- Oddly enough, raising threshold and/or nsteps seems to have no great effect on the speed of this filter.
Therefore the only drawback to using stronger settings is the possibility of oversmoothing.
- If VagueDenoiser is oversmoothing your image, you might want to consider method=0. If that doesn't work, then
reduce the threshold.
VagueDenoiser translates frames into the wavelet domain, filters the coefficients, and then does an inverse wavelet
transform. I admit I don't know just what that means, except it's kind of like the DCT-quant-iDCT process of JPEG
compression, except it doesn't use DCT. I know, not very helpful. But somehow, it denoises and boosts compressibility
without washing out the frame. Absolute Destiny describes it as "turning blocky noise into... noise which is more vague
looking", and I'd say that's about right. The effect really is nice though, most of the time.
Let me make no bones about it: I really like this filter. I use it in most of my encodes, and in all of my filter
tests, it always seems to help compressibility noticeably without hurting details or blurring too much
(as filters like Deen are more prone to do). The only other spatial smoother I can think of that aids compressibility AND
preserves detail so well is SpaceDust.
Here, have another Neon Genesis Evangelion (not Platinum) reference frame (hover over image to see
version filtered with VagueDenoiser(threshold=6,method=3,nsteps=6,chromaT=2.0)):
Look at any area of what's supposed to be flat color, and you'll see the noise being smoothed away -- not removed
completely, but reduced and made much less obvious. Isn't it much nicer that way?
But of course, I only used settings that strong because the source was so bad; such a high threshold
would probably be overkill on most sources. Besides, lower thresholds preserve even more detail. :)
One more note: If it's your goal in life to hunt down and destroy mosquito noise wherever it may be found, then you
might be better off using a different denoiser. VagueDenoiser doesn't seem to do as well on mosquito noise as it does on
blocky noise and fluctuations in large flat areas.
Back to top
Home -
Temporal Smoothers - Spatio-Temporal Smoothers -
Sharpeners - Dealing with Dot Crawl -
Dealing with Rainbows
Last updated on 10/2/08
Questions? Comments? Concerns? Contact Scintilla
Fight Spam! Click Here!